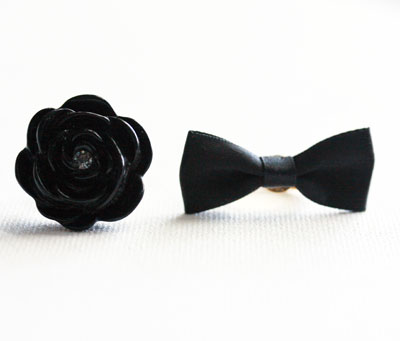
I had a few sharp eye readers notice my vintage earring to ring DIY that I occasionally wear on my lookbooks and ask for a tutorial. It’s really quite easy and not much skill is needed except the ability to use pliers and glue! 🙂 When I go vintage shopping, I often find pretty brooches or earrings and I think “that would look fabulous as a ring!” which is basically how I came up with the DIY. I stumble upon a lot of vintage clip on earrings that I love but wouldn’t wear as earrings so this is a terrific way to make good use out of them.


- I used 2 different glues because the Gem Tac glue is a lot less stronger and glueing the felt to the earring doesn’t require a super strong glue, whereas the ring base is really light and can fly off really easily so I used a much stronger adhesive to glue the ring base on.
- I searched high and low at all the craft stores around here for ring bases and came up with nothing so you may have better luck at the stores near you. If not, I went on ebay to get mine. I don’t remember the seller I bought them from, but these are the same bases. ($8 for 100 bases so not expensive at all.) I like that they are adjustable so I can wear them on any finger.
- The pliers I used are a jewelry pliers that also cut wire and other metals. Really effective when you have earring bases with posts or a pendant where you want to clip off the loop where the necklace goes. For the clip on earrings you can use regular pliers too.
- If the earring back (or whatever you are using) is smooth, you can probably skip the felt part. That’s just so you have a smooth surface to glue the ring base on.

Have fun with it and even just look through your own jewelry box for things that you stopped wearing long ago and see if you can upcycle them into a pretty cocktail ring for your finger! Just a caveat that this is not the most effective way to make into rings as the glue can become loose and it can fall off so I do recommend using very strong glue when making these and also jewelry pieces that aren’t too pricey/meaningful in case something does happen to them. I’ve had to re-glue a few that have come loose after a long day of wearing them and accidentally smacking them into things but really, a dab of glue is not so hard to do so it’s worth it to me!
P.S. A few new posts from me over at the Smarter blog! Check out my favorite accessory to add a pop of color to your outfit and my tips on how to style pleated skirts!


Twenty.Something
May 20, 2011 at 12:54 pmSo cute!! Great tutorial!! Def a new wknd activity for me!
x
http://artfashiontwentysomething.blogspot.com
CessOviedo
May 20, 2011 at 1:11 pmAwww these are so pretty! Great way to save some bucks and re-use jewerly! Let's see what I can find on my jewerly box, pretty sure there's something I can use, that black flower one looks kind of Chanel-ish, love it!
Cess O. <3 The Outfit Diaries
PetiteAsianGirl
May 20, 2011 at 1:32 pmYay…I asked for a tutorial a while back : ) I have clip on earrings that I want to change into post. Hopefully glue will be strong enough because I don't want to be wearing a bare metal post on one ear throughout the day, lol.
Stephanie
May 20, 2011 at 1:47 pmWhat an awesome idea. Definitely going to try this DIY project. I'm also going to see if using something like Gorilla Glue will make the jewels stay on. Will let you know how it turns out!
Christine
May 20, 2011 at 3:06 pmthis is absolutely fantastic! I used to frequent Michael's alot making my own jewellery but then I discovered F21, but making your on DIY jewellery makes it unique and n one else with have it! 🙂 love it! thanks for inspiring me 🙂
http://christinebalram.blogspot.com/
Marica
May 20, 2011 at 4:02 pmTutto super!!! Complimenti^^
Marica
Ps
Ti seguo sempre…)
Ria
May 20, 2011 at 4:06 pmOh i love this! 🙂 thanks!
Jen | Our Life Accounts
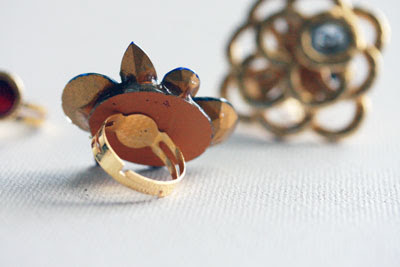
May 20, 2011 at 4:49 pmWhat a great post, I must admit I have several sparkley vintage clip on earrings that I have turned into fab cocktail rings-the blingy-er the better! 🙂 I have a couple that are very similar to the one you used in your example but I love the butterfly-esq one you got from your mom!
MizzJ
May 20, 2011 at 4:50 pmNeat idea! Actually, I wouldn't mind finding vintage clip-on earrings to use as earrings since I don't have piercings – where do you find yours?
Amber's Notebook
May 20, 2011 at 5:21 pmLOVE this DIY!! I have lose jewelry pieces I could use!
Sunshine
May 20, 2011 at 5:28 pmoohhh this has got to be one of my favorite tutorials! i will definitely try it. i have converted a few pieces into brooches before but never rings. thanks so much tiffany!!! <3
Under the California Sun
AubreyOhDang!
May 20, 2011 at 6:07 pmthis is smthg i actually might try at home. very practical esp if you have irregular sz fingers.
Lisa
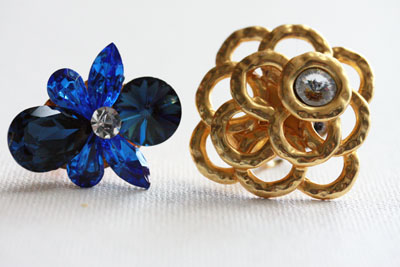
May 20, 2011 at 7:03 pmHeart the two tone crystal blue ring that one is so gorgeous!
kimmie
May 20, 2011 at 7:18 pmI've been looking high and low for ring bases so I could make my own rings too (or actually, just adjust some of the ones that I have that are too big or have the elastic bands (I hate those), but i guess I should just order them online 🙁
I really like all the rings you made, I can't wait to start making my own (like the bow one, too cute!) It's so much more cost effective 😉
Saba
May 20, 2011 at 8:17 pmlove this!
serena
May 20, 2011 at 8:22 pmcan you get the rings wet if you're covering the back with felt?
Richelle
May 20, 2011 at 11:05 pmAll this time I've been throwing stuff away because they were broken. I could've been turning them into rings!
Thanks for the tips Tiffany!
richelle
http://www.rarepersona.com
JENNY
May 20, 2011 at 11:53 pmtiff! you're so clever!! Loves it~
katou
May 22, 2011 at 9:05 amGreat post thank you for sharing with us your briliant DIY definetely gonna try it 🙂
http://insidekatouscloset.blogspot.com/
Annie
May 22, 2011 at 5:06 pmwhat a great idea!!
kcnoa
September 10, 2012 at 3:12 amWhere do you get the ring bases, Thanks
tiffanystylish
September 11, 2012 at 12:57 amjust search for "ring bases" on ebay, that's where I found mine!