


You see I’ve been in love with the gold sequin Zara clutch that I’ve seen on a ton of bloggers (seen here on my sister) and all over Pinterest. But I missed out on getting it online and don’t have a Zara nearby so I was searching for other cute sparkly clutches when I thought, “why don’t I just make one?” I wasn’t super attached to the yellow clutch so thought it would be the perfect canvas to make it glittery. Obviously the Zara one is covered in sequins but I did glitter because it was easier but just as pretty. Pictures don’t do this baby justice, it looks amazing in person!
- Clutch
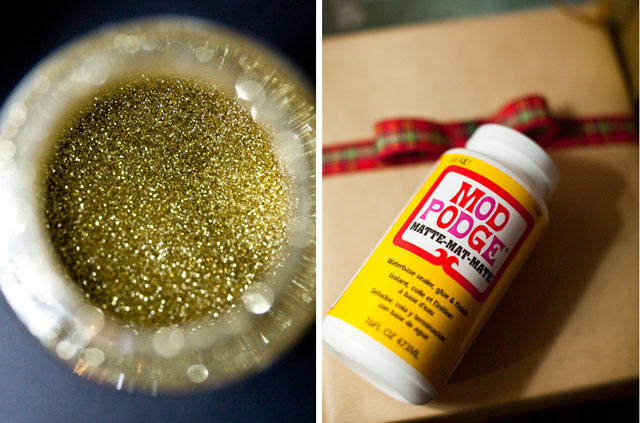
- Mod Podge
- Very Fine Glitter – I used Martha Stewart Glitter (and after this project, I’m seriously considering buying this set of all of the colors! I want to glitter everything now!)
*You could try chunky glitter if you want the look of the clutches above. I’m not sure how it will turn out but I do like the smoothness of mine. - Foam Brush
- Bowl
- Patience 🙂

I don’t have step by step pictures because I did this over two days and it was kind of a trial run for me anyway, but you don’t need the pictures because it’s super easy.
- Mix the glitter and Mod Podge into a bowl (I lined my bowl with foil so that it wasn’t a sticky mess and clean up was easy.) I’d say 1 parts glue to two parts glitter is good. I just eyeballed it though until I thought you could see enough glitter through the glue mixture. You want more glitter because when it dries you want as much glitter stuck on as possible, otherwise you’ll have to do way more coats.
- Start painting the clutch with the foam brush. Do only one side! When you paint it on, it will be all white and goopy, don’t worry, it dries clear and all you see is glitter.
- Wait 20 minutes or longer until it’s dried and you see the glitter.
- Wash your brush thoroughly between layers of painting because you don’t want your brush to get hardened and not be able to paint anymore.
- Paint the next layer with the same mixture.
- Repeat steps 3 – 5 until the entire surface is covered in glitter or until you are happy with how it looks!
(I wasn’t sure how much Mod Podge and glitter I needed so I just bought the big sizes of both, but ended up using about only 1/3 of both of them.)
Tada! That’s it. Mine took about 4 coats on each side. My clutch has a zipper on the back and I just painted over the entire thing so you can’t open the zipper anymore but it didn’t matter that much to me. I never used that back pocket anyway.
The best part about doing it this way is that there is no glitter fall out! I have been leaving this clutch all over the place, on our dining room table, on the couch, on my bed and no glitter has fallen off. Hubs loves it because usually when I do glitter projects, we find glitter EVERYWHERE. haha! And it’s great because it doesn’t come off on your hands. Now I have the perfect glitter clutch for the holidays!


atouchoflovely
December 15, 2011 at 1:50 pmI'm in a glitter craze at the moment and will definitely be doing this!
Schnelle
December 15, 2011 at 1:55 pmThat's such a great idea! I have been afraid to "glitter" anything because I hate that messy glitter fallout so I'm so happy to hear that you found a fool proof method.
Yvonne Huynh
December 15, 2011 at 2:01 pmoh wow great job!!! looks so good and can't even tell you made it! Im going to have to try this.
CessOviedo
December 15, 2011 at 2:08 pmOh you made a fantastic hob with it! I DIY Zara's sequined clutch on my post today, what a coincidence! Seems like gold sparkly clutches are the perfect holiday accessory!
Cess O. <3 The Outfit Diaries
Erin
December 15, 2011 at 2:08 pmi am obsessed with glitter too! i have a diy project with the old school nutcrackers that i'm gonna finish this weekend! basically spray painting them white, then mod podge with glitter. Hoping it works!
rolala
December 15, 2011 at 2:10 pmI love this DIY. Thanks for sharing!
Elle
December 15, 2011 at 2:26 pmThis is a great project, thank you for the step by step!
Hannah @ The New Black
December 15, 2011 at 3:09 pmThat sounds easy enough that even I may be able to handle it! I've never used Mod Podge before. Does the layer crack near the hinge of the flap from opening and closing?
julie
December 15, 2011 at 3:20 pmGLITTER!! So much fun. And easy enough too. LOVE it. 🙂
Leticia
December 15, 2011 at 3:54 pmGreat job on the clutch!
LC
December 15, 2011 at 4:15 pmgreat idea!
JJ
December 15, 2011 at 4:17 pmFantastic DIY, thanks for sharing! I'll definitely have to try something similar with one of my worn, beaten up bags. It's a great way to give them a fresh start!
Lily
December 15, 2011 at 5:10 pmYour clutch looks amazing !! Such a good idea. I love that Zara clutch !
xxLily
goldandgray.com
SassyUptownChic
December 15, 2011 at 5:14 pmTiffany, that clutch looks awesome girl! You did a fantastic job. I'm LOL at "I want to glitter everything!" Do it girl! I think a red clutch is in your near future. Have a great day!
http://sassyuptownchic.blogspot.com/
Savvy Gal
December 15, 2011 at 5:29 pmoh nice love it.
Sianna
December 15, 2011 at 6:04 pmVery nice =)
AubreyOhDang!
December 15, 2011 at 6:42 pmmod podge is magic! it does everythg.
Vivi
December 15, 2011 at 6:46 pmYour DIY turned out pretty darn well. You can even sell it.
katattack2000
December 15, 2011 at 6:55 pmWhat a great idea 🙂 If you can't buy it! Make it 🙂 hehe Though I have never heard of mod podge?
katattack2000.wordpress.com
Jenna Wood
June 28, 2012 at 8:00 pmIf you've never used mod podge before, prepare to become obsessed. It is AMAZING stuff!! Haha! Have fun!
Really Petite
December 15, 2011 at 6:59 pmLove it! Yours turned out beautifully 😀
DiamondsandTulle
December 15, 2011 at 7:13 pmThat is really awesome Tiffany! I LOVE it! I actually have the Zara clutch but always tempted to buy more sparkly bags! I might have to go thru my bags to find an old one to modge podge! 🙂
xx Vivian
★☆AdamAlexMommy☆★
December 15, 2011 at 7:51 pmwhat a great DIY project. i love how yours look on you. stunning is an understated word for this look. 🙂
alison*elle
December 15, 2011 at 8:03 pmAh, it looks great Tiffany! I would be worried about glitter fallout too so great to hear that there hasn't been any.
xo, alison*elle
Natasha Fatah
December 15, 2011 at 9:44 pmLove this post Tiffany. I've been wanting to try this myself. And also get a pair of cheap boots, and glitter those up as well. I might do it over the holidays. Looking great, as usual!
http://www.natashafatah.blogspot.com
bevy
December 15, 2011 at 11:23 pmwow, i'm super impressed! great job! I wondered about loose glitter, but it sounds like it's holding up!
just tututiny
December 15, 2011 at 11:44 pmThe clutch looked great in the beginning and now it looks awesome 😉 You are so creative Tiffany!
Aline
December 16, 2011 at 12:16 amthis is such a cool diy, i absolutely love how it turned out! i have a little clutch i may try this with!
Blanca1018♥
December 16, 2011 at 2:04 amgreat idea! super creative and the result is gorgeous and very stylish.
Thanks for sharing with us doll.
tiffyama
December 16, 2011 at 2:27 amThough I'm not a "flashy" person…I seem to always be drawn to smaller, flashy items. XD love this diy!! It's super cute and perfect for the hoidays~
cinzee
December 16, 2011 at 6:08 amWOW!WOW! You DIY'ed that?????? That's amazing!!! I've never done any DIY, not that i can think of,lol. I really should be adventurous and give it a try.
This glittery clutch is soo pretty and festive! Perfect for the Christmas days coming up!!!
Cinz
http://cinzee.wordpress.com
Meisha.Style
December 16, 2011 at 6:41 amlove it!
George Wells George Wells
December 16, 2011 at 8:44 amThank you for sharing, sparkly uggs boots fashion style in winter.
Fabrizia
December 16, 2011 at 2:30 pmSuch a nice post, I enjoyed it a lot! I like your sense of style! Wonderful photos!
Take a look and if you want we can follow each others: Cosa mi metto???
Michelle
December 16, 2011 at 3:25 pmyou're so crafty, i love it! i have the zara clutch and i think i might like yours better – the fine glitter is so pretty!! happy friday tiffany!
tiffanystylish
December 16, 2011 at 5:28 pm@Hannah @ The New Black Hi Hannah! No cracking at the hinge, it's pretty smooth throughout. Mod Podge does a good job of just taking on the shape of the clutch without altering the feel of the material which is great and perfect for this kind of project.
Bunnie
December 17, 2011 at 2:03 amOMG! This is an awesome idea! I love it. The clutch looks gorgeous gold and glittery. You can't even tell that it was a DIY!
Love the blog btw. 🙂
xo
Karen (littlepiecefnb)
December 17, 2011 at 4:00 amOmg you did an amazing job on that!
Christina D
December 17, 2011 at 4:35 amI am a new follower and thanks for sharing this great tip. I can't wait to try it for myself.
Amy Anderson
December 26, 2011 at 1:13 amI LOVE your version – it's so pretty!!
appleling
December 26, 2011 at 9:42 amYour blog is very interesting, I like it very much, you can welcome to have a look uggs sparkle, I hope you will like it
CREATIVE MIND
December 29, 2011 at 1:30 pmHow NICE ~ Love it
appleling
January 5, 2012 at 3:22 pmYour blog is very interesting, I like it very much, you can welcome to have a look uggs sparkle, I hope you will like it
Sofia Carvalho
January 10, 2012 at 2:11 pmGreat post! I love DIY.
Congrats!
I'm following.
Kisses from Portugal
Nobhule
March 19, 2012 at 1:32 pmLove it! I tried it with an old pair of TOMS yesterday and it worked perfectly, thanks for the awesome idea!
Allie H.
June 15, 2012 at 4:13 pmIf you're worried about glitter coming off you can always wait until it's mostly dry, about tacky and lay down another layer of just plain, clear mod podge over the top. I definitely want to do this! I'm such a fan of glitter.
Elle
September 10, 2012 at 8:27 pmHey there,
I saw this DIY and immediately had to do it. I did a cheap cell case for my galaxy s2. It had some ridges, so I thought maybe that was why I had problems with it being weird/sticky, but I also did a small pill case lid (which is just a cleaned out cream eyeliner container), a smooth eye glasses case, and my makeup brush/bobby pin catchall. Allll of them are tacky. I put my glasses case, pill container, & cell (with cover) in my purse, and when I pull them out, there's ALWAY stuff stuck to them. I used genuine mod podge (as opposed to the "home recipes" from around the web that I use for other stuff), and I tried putting just a clear coat, too, but MAN! EVERYTHING sticks, and half the time my glasses case is SO stuck together from the few little places the glitter/podge combo it went over the edge to where the edges close, that I have to use a butter knife or credit card to pry it open. In all of your glittering, have you ever had problems like this? I LOVE the look, and I get LOTS of compliments, but I'm losing a lot of the luster, since stuff is getting stuck and making it dull. Would love to hear your thoughts. Oh, and ps, for things that I don't have to touch a LOT, it's great–my makeup catchall by the sink is just fine!
tiffanystylish
September 11, 2012 at 12:55 amHi! Oh no, that sucks that it's still sticky. That hasn't happened to me at all. I'm wondering if you are using too much mod podge? Maybe add more glitter to your mix. Or are you giving it enough time to dry between coats? I make sure that the entire surface is dry before I put on the next coat.
I hope that helps!
Kristina
January 10, 2013 at 4:05 pmHi Tiffany! I'd like to try this but I'm curious about durability. Do you still use this clutch after a year? Has the Mod Podge peeled or wrinkled at all? I only ask because I would expect it to (I also would expect it to be slightly tacky, as the previous commenter mentioned) so I'm interested to know your experience, if you wouldn't mind sharing it. Is this tutorial ideal for things you want to keep and use for a long time, or is it more of a way to make a perfect piece for a special event or two?
tiffanystylish
January 10, 2013 at 9:42 pmHi Kristina! I still use the clutch and it looks pretty much the same except for the top edge has had some glitter fall off because when you open and close the clutch it creases and the glitter doesn't have much to hold on to. I don't use the clutch too often though so it probably has helped keep the same condition. I've used it probably 5-6 times this past year. Because the rest of the clutch is smooth, I haven't had any other problems with it. I would probably recommend doing this to pieces that are good for a special event and not really every day use.
mary bridgers
February 6, 2013 at 10:55 amHi tiffany. Can u do agoes.will they be water resistant.does the surface of rhe item have to be rough or can it be like alick like vinyl? ?? Also will this work with sequins
tiffanystylish
February 13, 2013 at 3:09 pmI think as far as rain goes, it should be fine but I haven't taken mine out into the heavy rain so not sure.
The surface can be anything but probably better to be a flat surface so that you can get the mod podge mixture on smoothly. If it's rough it might go on uneven and not look so good.
I haven't thought about trying it with sequins but it might work!
nazani
February 12, 2013 at 2:51 pmAre you selling this tutorial as a download?
http://www.listia.com/auction/8209589-glitter-clutch
If you need to contact the Listia moderators, try this:
(347) 254-7842
complaint form
http://help.listia.com/attachments/token/dnwmhgif0tchkbv/?name=NoCI.pdf
tiffanystylish
February 13, 2013 at 3:07 pmNo that's not me selling it. So strange. Thanks for the heads up, I will contact them!